Building your own frames
I'll start with building frames. Using Foundation-less will follow at the bottom.
Had a few questions Emailed to me, so I did the video below to help make the methods understandable. I'll replace the vid when I get better with the Camera.
It's time versus Money. YOU, have to decide if the time spent is better being used elsewhere. If you can make more money with your time than it would save you building or assembling your own frames and equipment, then you are better off buying all of your stuff. If, you are like me, then you have some spare winter TIME when you can get crafty!
So, lets get started;
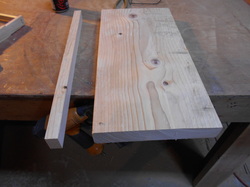
Cut your 2x material to 19" You can use a piece of 2x10, 2x8, 2x6, EVEN a 2x4!! Set the table saw to cut a perfect 7/8" piece off of it, (Lengthwise) and continue to run it through. You will lose a few due to knots, its part of the process.
Lay the piece flat after its cut off, and cut it into a perfect 7/8 by 7/8 square bar. Save the piece you just cut off, because that will be your bottom bar. You shave the bottom bar to 3/8 by 5/8.
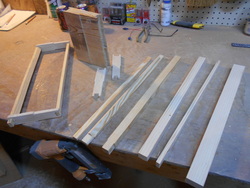
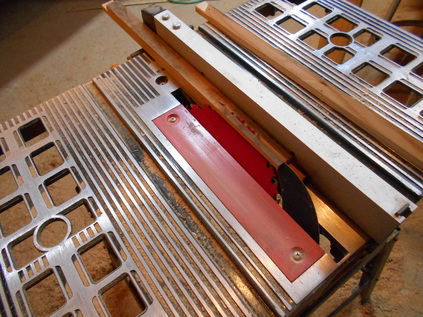
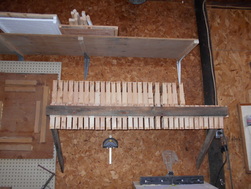
In order of construction from right to left.
This picture was actually taken when I was using 1" top bars. I had to shave sides to make them 7/8. After 500 or so I decided the bees wouldn't care a lot if I skimped an eighth of an inch on the top bar. Turns out it was a good decision. They haven't complained once!!!
This picture was actually taken when I was using 1" top bars. I had to shave sides to make them 7/8. After 500 or so I decided the bees wouldn't care a lot if I skimped an eighth of an inch on the top bar. Turns out it was a good decision. They haven't complained once!!!
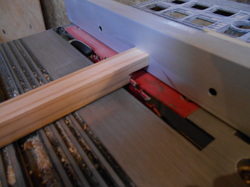
Adjust your blade up so you LEAVE 3/8 of an inch after shaving the ends. You want to set the guide so that its one inch from the OUTSIDE of the blade. keep your fingers clear, and gently work the bar back and forth until that end is finished, flip the bar end for end and do the other side.
PAY ATTENTION! It is easy to let your mind wander when your doing a hundred of these. I haven't lost another finger, or even came close, but I have flipped an occasional bar and shaved the wrong side because my mind was not on task.
ALWAYS use a good sharp blade! It makes a nice smooth finish with little to no splintering.
Alternate method; Use your router. I popped together a quick jig so I could do ten top bars at a time. It worked, and is perhaps a little faster, but the cheap router bits I buy don't last long. This one lasted about 80 bars, or 160 cuts since both ends are done.
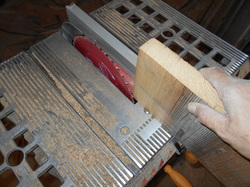
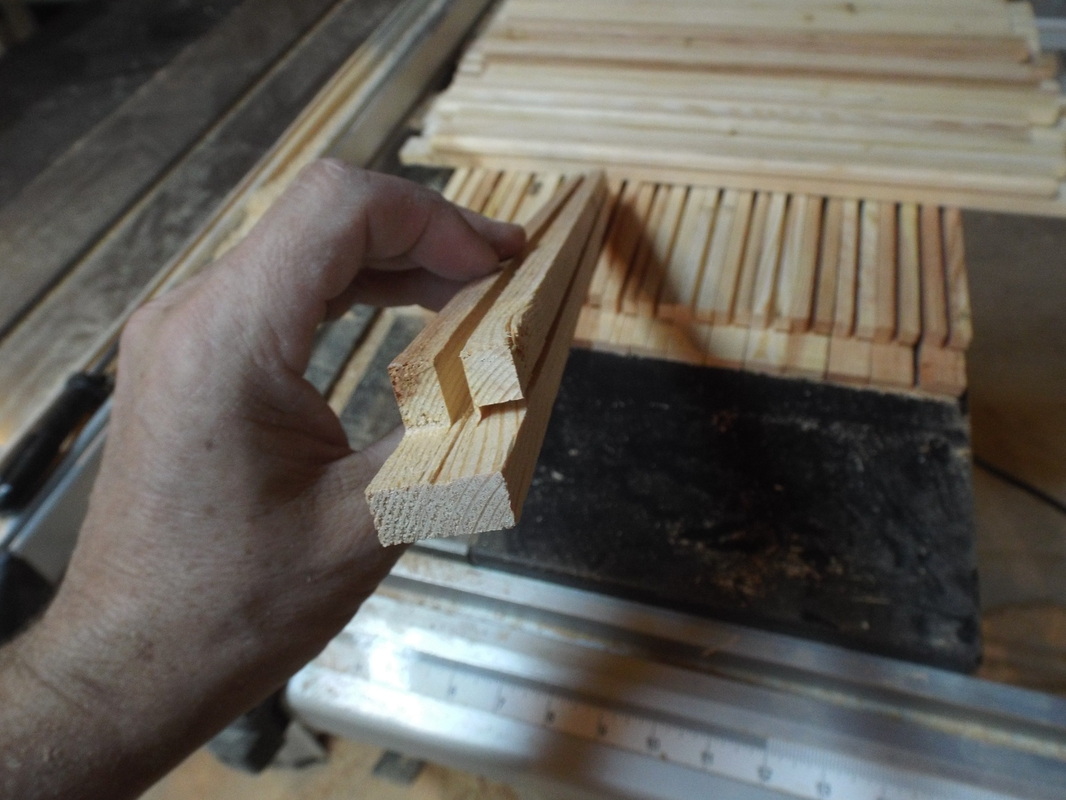
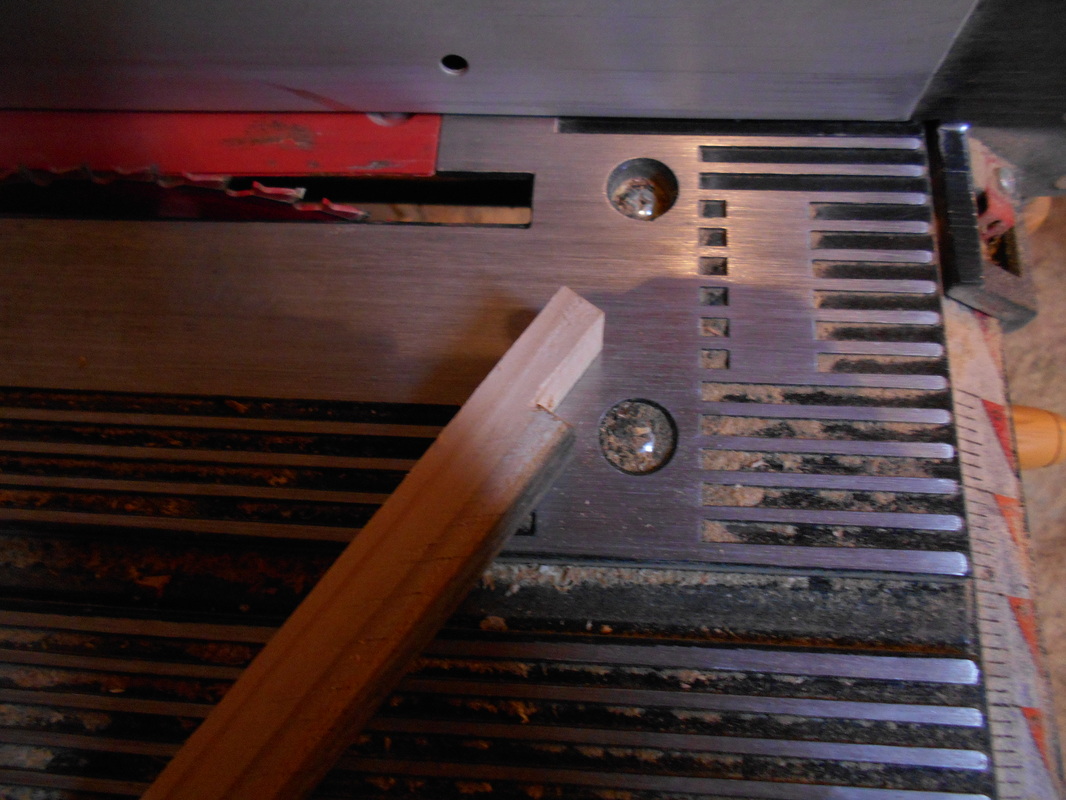
NOW, tilt your blade to a 45 degree angle, and put your guide on the opposite side. Adjust the blade so it JUST pokes through the top of the bar. Adjust the guide in so that the blade JUST clears the flat you shaved into the end and run the piece through. Turn it around and run the other side through. If done right, you should now have a neat sharp point for the bees to use as a guide to draw their comb from.
If your interest is in using foundation, cutting the groove and the wedge side cut is as simple as adjusting the blade and running the cut;
If your interest is in using foundation, cutting the groove and the wedge side cut is as simple as adjusting the blade and running the cut;

Side bars.
For this part you need to decide what method is best for you. You have a 6 1/4" piece of 2x8 2x10 etc that is 1 1/2 inches wide. you need to make it 1 3/8 inches wide. I have seen band saws used, but my fingers fear them.. I found a Dewalt DW733 planer in my folks shop they had gotten at a sale somewhere, and absconded with it. It needed new blades, but works SPLENDIDLY to shave the 1 1/2 inch boards down to 1 3/8, and makes them FLAT in the process!
Once I have the 2x shaved to 1 3/8, I run the table saw blade up as far as it will go, and then KERF 1/8 inch off each side of my block as shown to the left., until the bottom of the block measures 1 1/8. It is easier than it sounds.
|
|
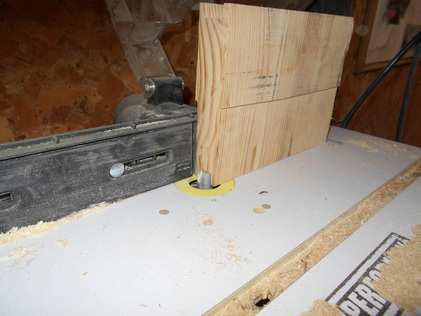
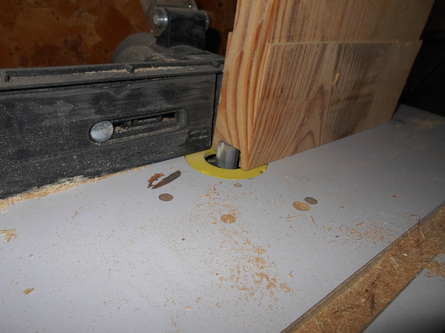
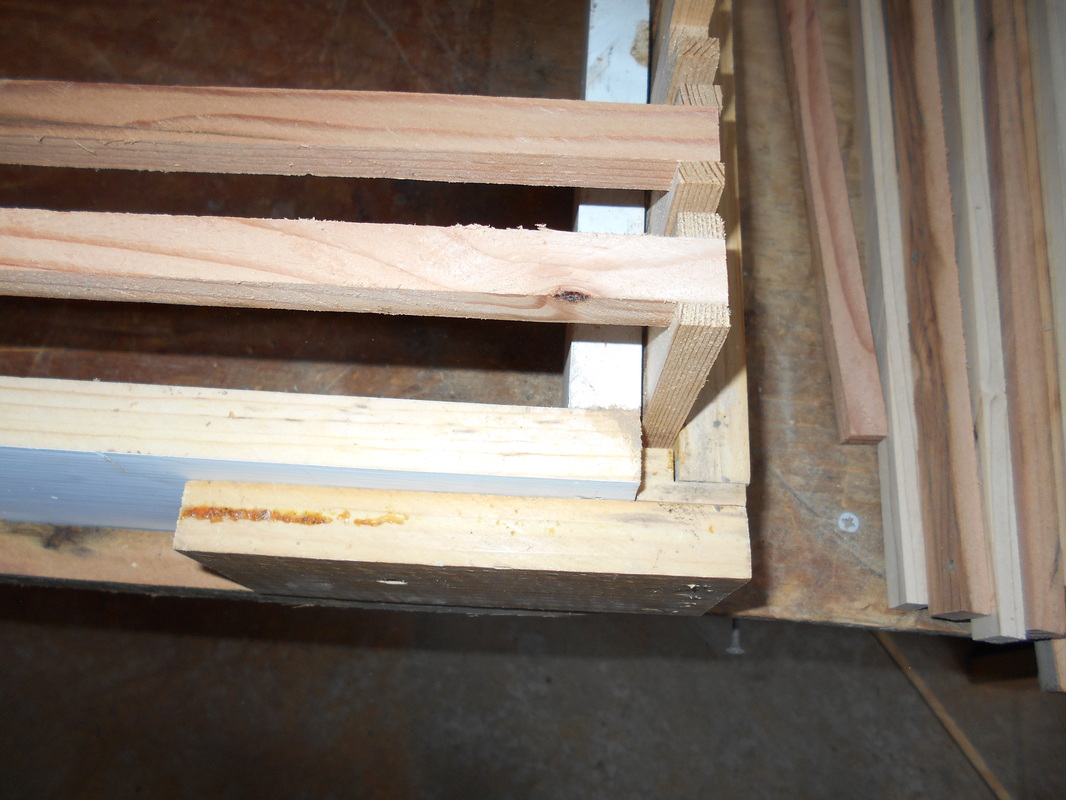
Put a 5/8 straight bit into the router/table and adjust the guide so that the bit is CENTERED in the 1 1/8 side of your block as shown to the left. Adjust the depth to 3/8 of an inch, and run it through.
Turn the block over, and run it through again. Turn the block around, and run it through the third time. as shown on the right. If done correctly, your top slot will measure 7/8 of an inch, and the bottom naturally will be 5/8. Your top, and bottom bars should fit into these respective slots without being so tight it splits the end bars when you push them in.
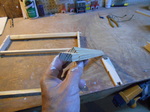
Using the slide/table square makes even more sense. Doing the last cut or two you still need a stick to hold the material while keeping fingers away from the blade.
Turn the block over, and run it through again. Turn the block around, and run it through the third time. as shown on the right. If done correctly, your top slot will measure 7/8 of an inch, and the bottom naturally will be 5/8. Your top, and bottom bars should fit into these respective slots without being so tight it splits the end bars when you push them in.
Using the slide/table square makes even more sense. Doing the last cut or two you still need a stick to hold the material while keeping fingers away from the blade.
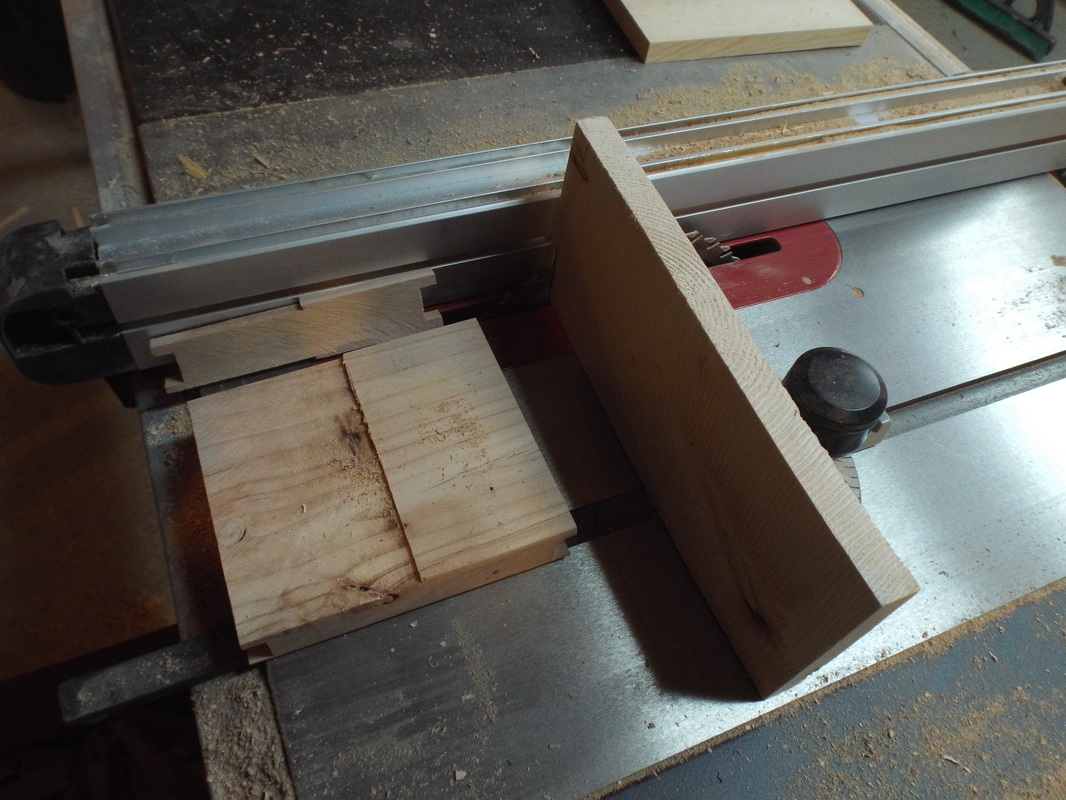
Set your table saw to 3/8 and lay your block on the table, with the small end toward the blade. Use a push stick, and begin shaving the 3/8 end bars off of your block. It is smooth and easy, and you can turn out a LOT of the end bars in a short time. Use care when you get down to the last two or three. USE A PUSH STICK, or toss the last bit aside if your not VERY confident and cautious.
NOW, you have all the components to begin assembling the frames!
NOW, you have all the components to begin assembling the frames!
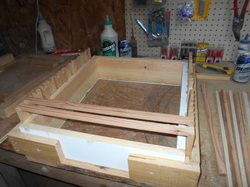
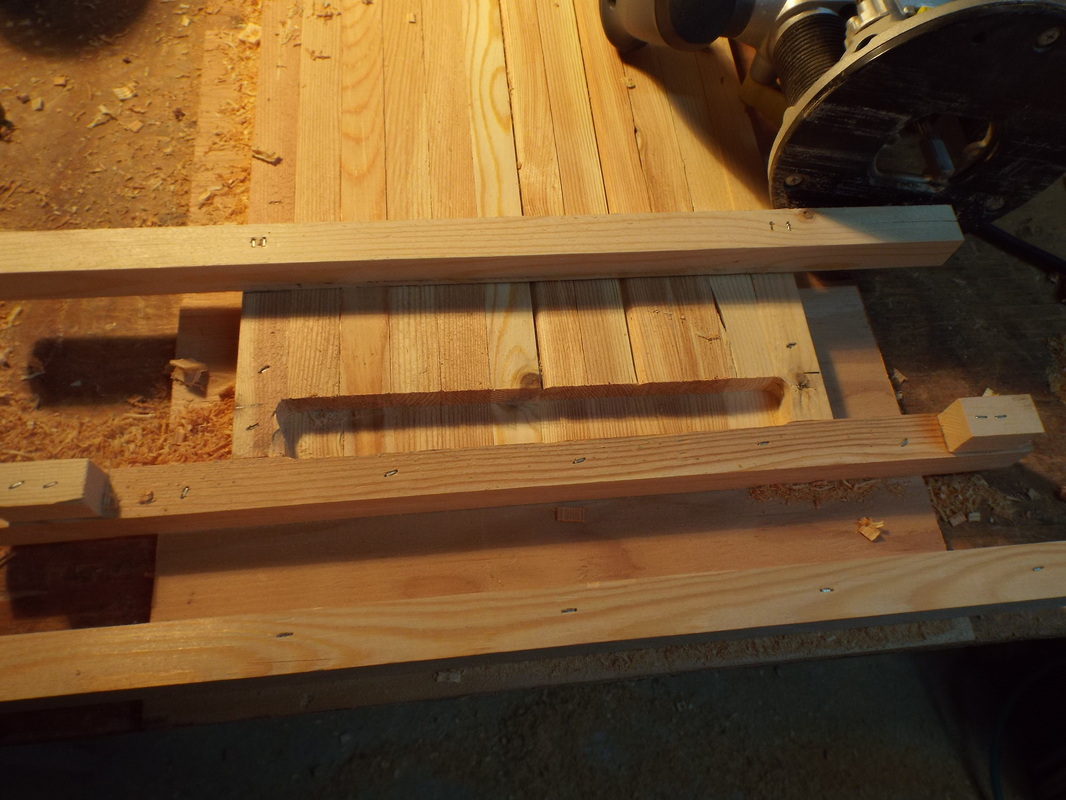
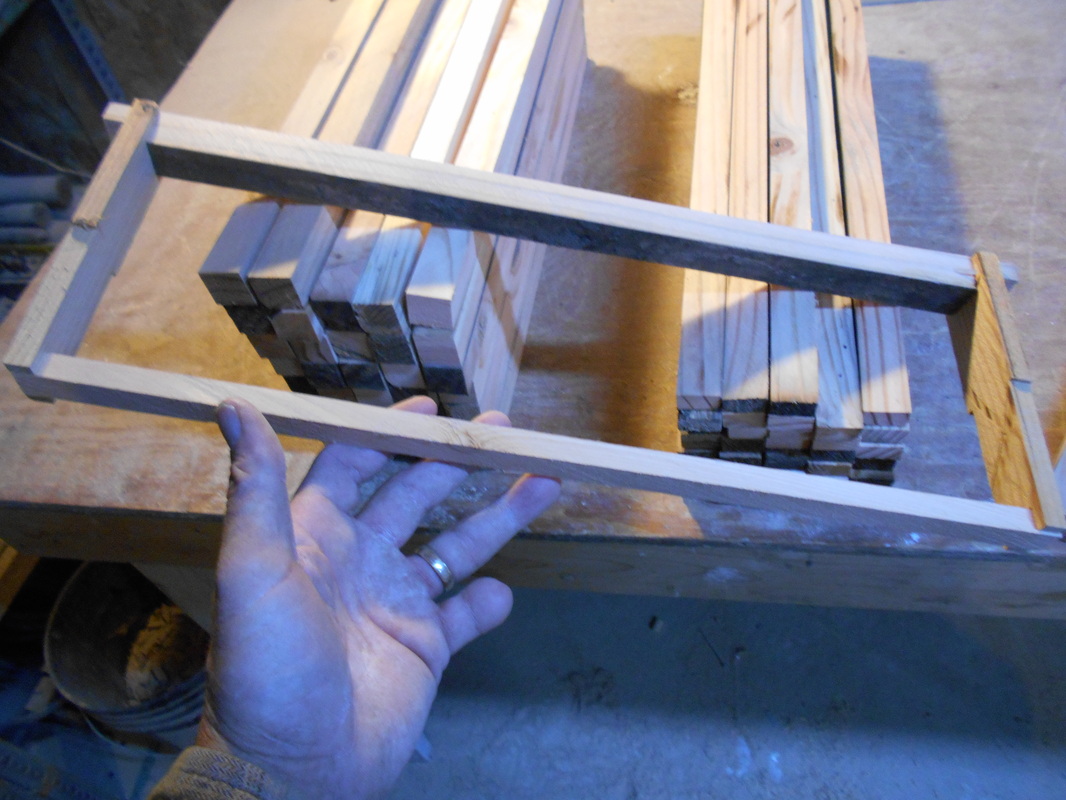
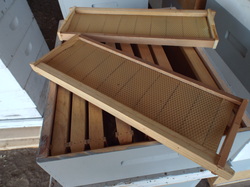
There are multiple vids and instructions for making a jig to assemble the frames. This is a picture of the one I made with leftover pieces of wood. It can make 13 frames at a time.
Run a drop of glue against each tab beside the bottom bar slot, both sides, just a drop on each side. as you slide the bottom bar into place, preferably with SLIGHT pressure, it will force the glue down and cover everything. Slide all the bottom bars in place, then.. nail or staple the bottom bars in. Hammer and nails, Stapler, or in my case, I use a brad gun with 3/4 inch nails. two in each end.
Flip the jig over, glue, press the top bars in place, making sure they are seated inward as well as down, and double nail each of them. THEN, cross nail the sides under the bars at a SLIGHT upward angle to lend more strength for prying those bars out when they are heavily propolis'd in place. Undo the jig and slide the frames off!!!
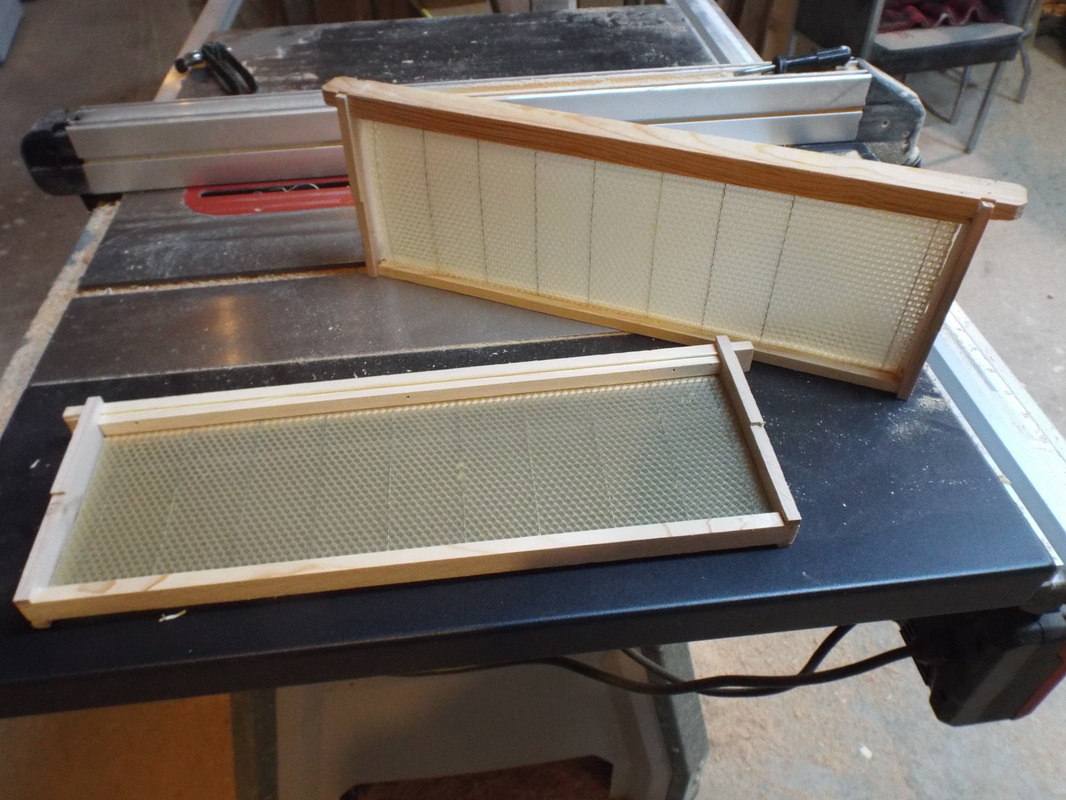
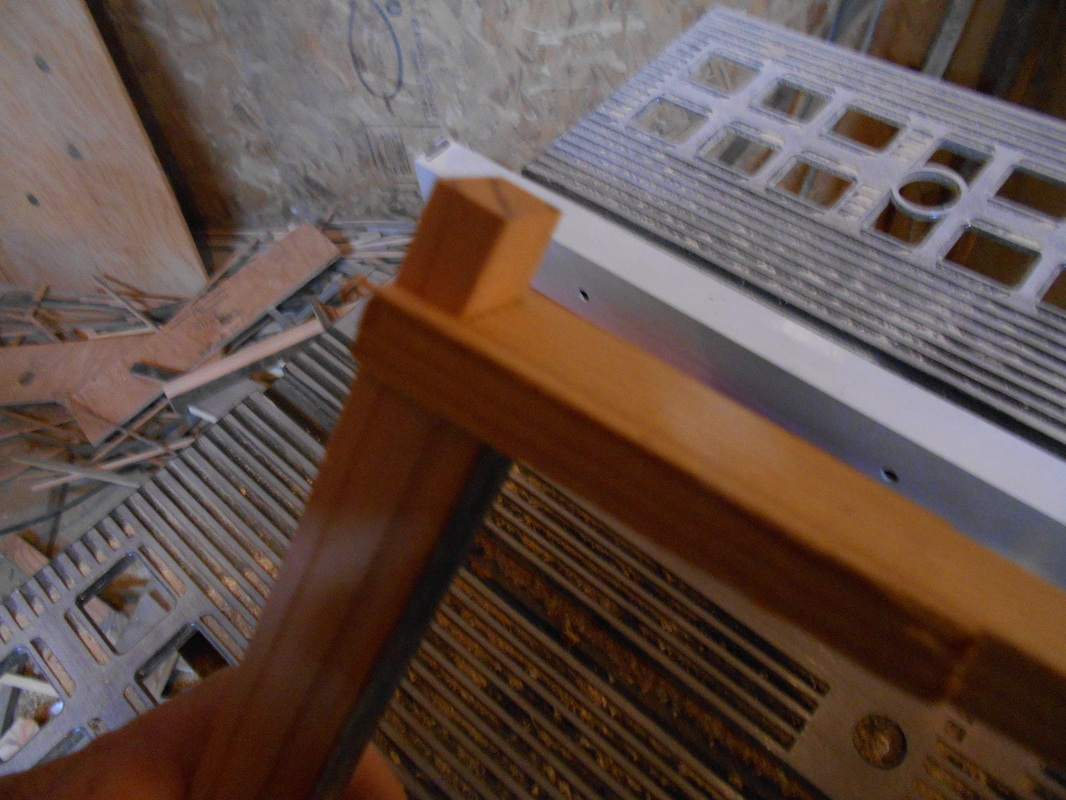
Here is a commercial frame. (Standing up) and a frame I have created myself. Do you think the bees will see any difference between the two? Do you think they will be angry this frame cost me 27 cents for the wood and has foundation from a buyout installed in it? Would they be happier on the commercial frame that cost nearly three dollars?
Run a drop of glue against each tab beside the bottom bar slot, both sides, just a drop on each side. as you slide the bottom bar into place, preferably with SLIGHT pressure, it will force the glue down and cover everything. Slide all the bottom bars in place, then.. nail or staple the bottom bars in. Hammer and nails, Stapler, or in my case, I use a brad gun with 3/4 inch nails. two in each end.
Flip the jig over, glue, press the top bars in place, making sure they are seated inward as well as down, and double nail each of them. THEN, cross nail the sides under the bars at a SLIGHT upward angle to lend more strength for prying those bars out when they are heavily propolis'd in place. Undo the jig and slide the frames off!!!
Here is a commercial frame. (Standing up) and a frame I have created myself. Do you think the bees will see any difference between the two? Do you think they will be angry this frame cost me 27 cents for the wood and has foundation from a buyout installed in it? Would they be happier on the commercial frame that cost nearly three dollars?
Video; Assembling foundation-less frames after all that work to cut them out.
Fix any blowouts, and set the frames aside to let the glue dry!!!!
I used to paint melted beeswax on my frames before use. I have been told it is not necessary.. I prefer to have a bit of wax on them as an added HINT to the bees.. another beek stopped in to pick up his boxes, and asked me why I wanted to waste so much wax!!?? He grabbed a bar of wax, and RUBBED it across the point of the frame, leaving a nice narrow coat.. From that moment on I have RUBBED instead of painting. The bees still get the hint, and I use less than a tenth of the wax I did painting!!!
I used to paint melted beeswax on my frames before use. I have been told it is not necessary.. I prefer to have a bit of wax on them as an added HINT to the bees.. another beek stopped in to pick up his boxes, and asked me why I wanted to waste so much wax!!?? He grabbed a bar of wax, and RUBBED it across the point of the frame, leaving a nice narrow coat.. From that moment on I have RUBBED instead of painting. The bees still get the hint, and I use less than a tenth of the wax I did painting!!!
If you prefer to use plastic foundation, omit the 45 degree angle cutting, and run a groove down the top and bottom bars in the center of each instead. Assemble as shown, and pop your foundation in!! If you want to use wax, it only requires another side cut on the top bar so you can break the wedge out, install the wax, and nail the wedge back in.
IF, you use deep frames, cutting the KERF in the sides of the block wont work as the saw blade is not tall enough. You will have to router the side bars one at a time, or find another means of narrowing the bottoms of the frames. Maybe a 12 inch table saw would work instead of the ten inch? I do not know, as I only use mediums, so that's all I build.
Nine bucks for a 2x10x8 that makes 45 top and bottom bars minus a couple per board for knots = twenty cents.
18 side bars per 6 1/4 piece of 2x makes 270 side bars / = 135 frames. 10 bucks a board = 7 cents for two.
27 cents per frame.
1000 wedge top frames = 1000 dollars (+ a bit with shipping), compared to 270 bucks for a thousand home made..
(Out dated Info, frames cost even more now. Wood is still about the same!)
I HOPE, this helps someone save a bit of money and fills those long winter days when we cant poke our noses into any hives!
A few pictures below to add a bit more detail.
|
|
|
|
|
Using Foundation-less Frames
Foundation-less
Why on earth would I want to use foundation-less frames and deal with all the problems?
I guess my answer to that would be.. what problems?
Why on earth would I want to use foundation-less frames and deal with all the problems?
I guess my answer to that would be.. what problems?
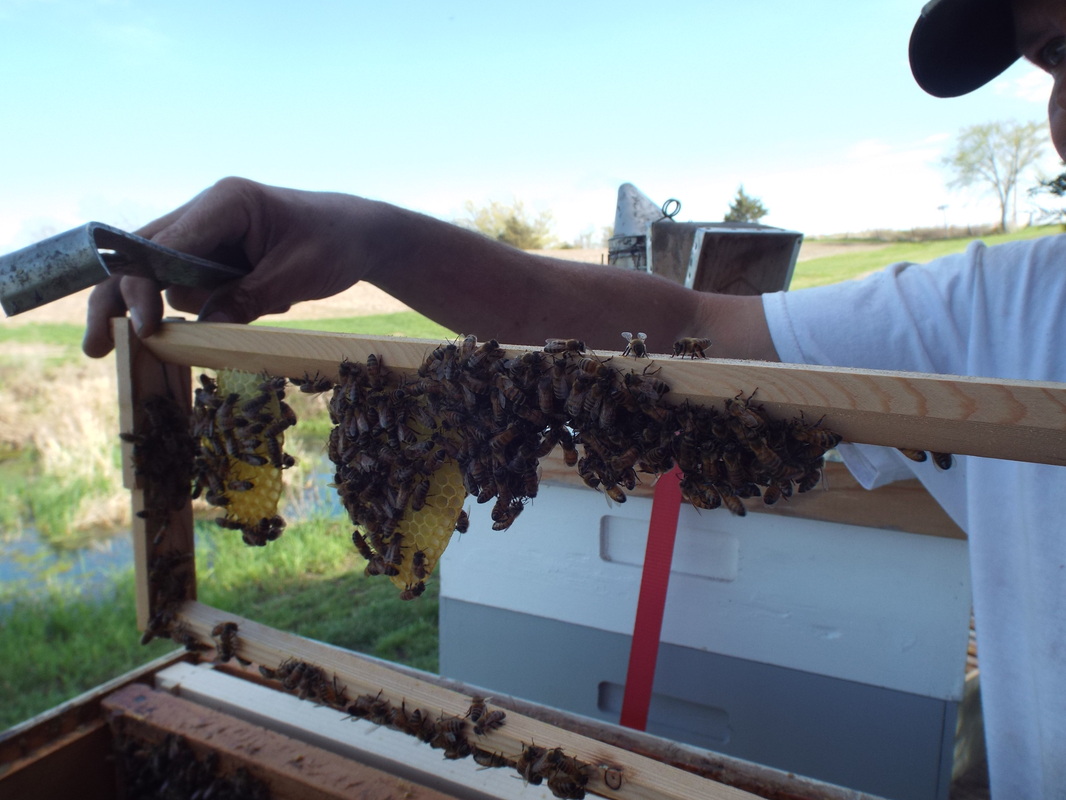
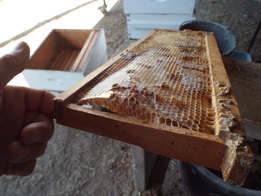
The frame in the picture above can be handled as you would any frame. It is not yet attached on the bottom or sides but IS strong enough to turn about easily.
The frame in the picture below is an example of a frame you wouldn't want to handle without considering the consequences.
The frame in the picture below is an example of a frame you wouldn't want to handle without considering the consequences.
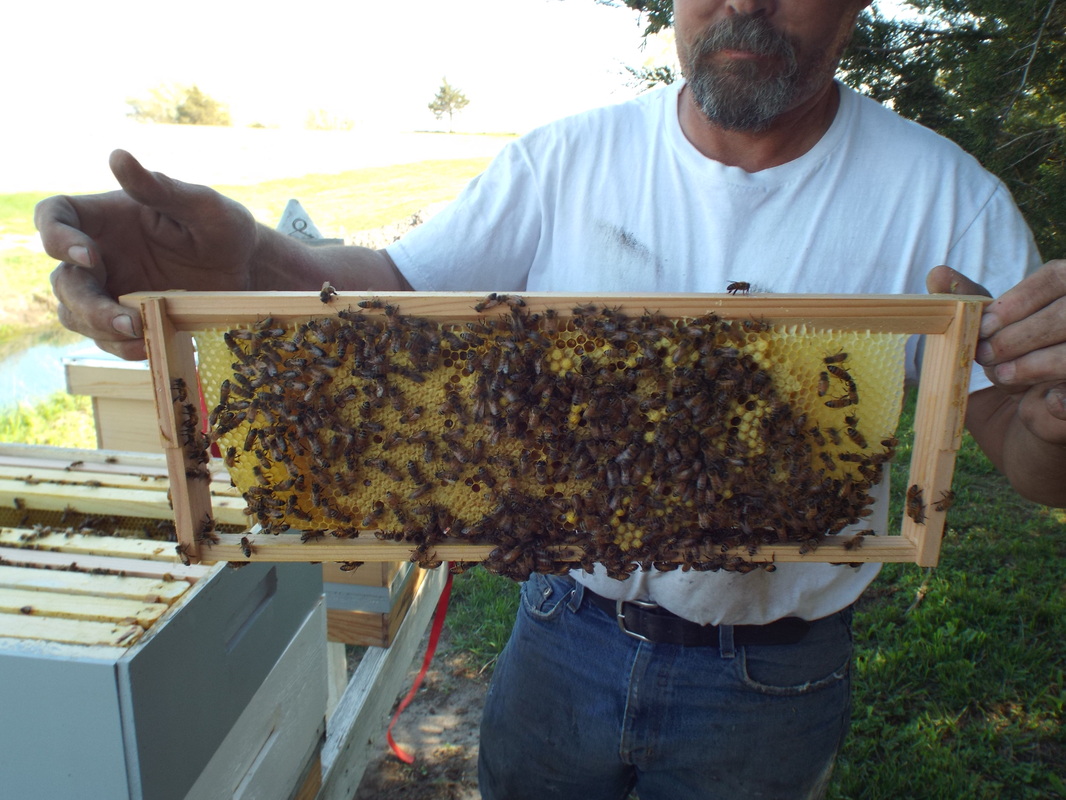
The frame in the picture below is not yet fully drawn, but it is attached at the bottom and as you can see, is easily manipulated. See the queen?
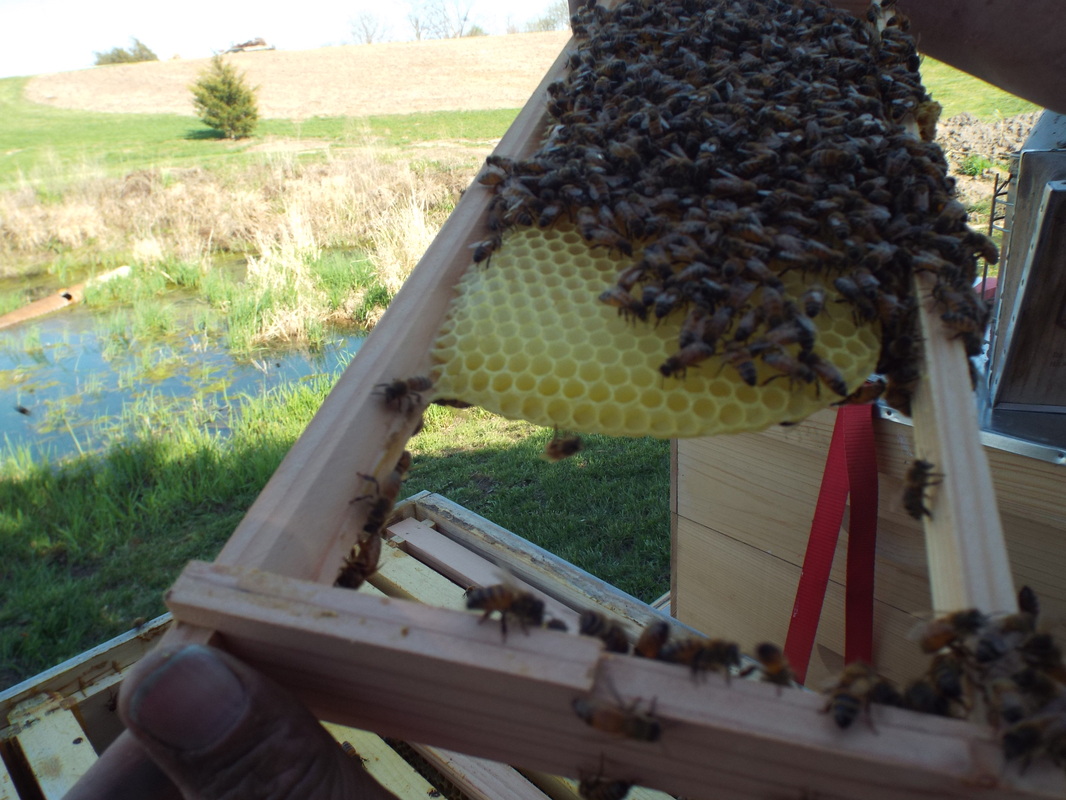
She is the bee in the bottom left corner. I didn't see her when the pic was taken until she climbed off the frame onto my hand. She hid between my fingers and I had to gently shoo her back into the hive.
(Quote from Michael Bush's site)
Having a uniform frame size has simplified my life. If all your frames are the same size you have a lot of advantages.
You can put anything currently in the hive anywhere else it's needed.
For instance:
1. You can put brood up a box to "bait" the bees up. This is useful without an excluder (I don't use excluders) but it's especially useful if you really want to use an excluder. A couple of frames of brood above the excluder (leaving the queen and the rest of the brood below) really motivates the bees to cross the excluder and start working the next box above it.
2. You can put honey combs in for food wherever you need it. I like this for making sure nucs don't starve without the robbing that feeding often starts, or bulking up the stores of a light hive in the fall.
3. You can unclog a brood nest by moving pollen or honey up a box or even a few frames of brood up a box to make room in the brood nest to prevent swarming. If you don't have all the same size, where will you put these frames?
4. You can run an unlimited brood nest with no excluder and if there is brood anywhere you can move it anywhere else. You're not stuck with a bunch of brood in a medium that you can't move down to your deep brood chamber. The advantage of the unlimited brood nest is the queen isn't limited to one or two brood boxes, but can be laying in three or four. Probably not four deeps, but probably in four mediums.
I cut all my deeps down to mediums.
Typically I hear the question, "do they winter as well?" and I say they winter better in my experience as they have better communication between the frames because of the gap between the boxes.
Steve of Brushy Mt. used to say there was some research to this effect, but I'm unsure where to find it now.
(End Quote from M.B.)
It is easier to quote Mr. Bush than it is to re type it all.
I am going to add COST to these reasons. You don't have to buy foundation.
You can make cut comb honey even nicer than if you used thin wax foundation.
Time.. You do not have to spend a LOT of time installing wax, or a little time installing plastic.
The bees REALLY like to do it their way. It has been my experience that they draw out natural comb faster than they do plastic, but about the same as they do with wax foundation.
( Edit; This spring the bees are even bypassing the wired wax foundation in favor of foundation-less. "Spring 2014")
Don't ever let anyone convince you that you will not have problems with foundation, be it wax or plastic, large or small cell. The bees often have their own ideas of what they want, and there is nothing you can do to convince them otherwise, besides scraping the frames and making them start over. Even that will often result in an exact duplicate of what you just scraped off.
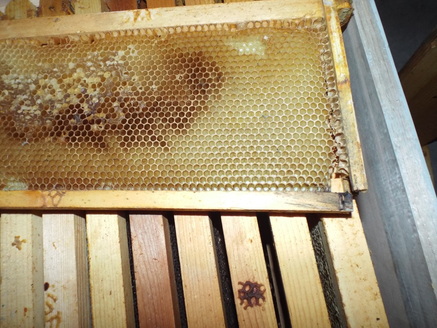
The picture below is of a plastic rite cell foundation, large cell, that was scraped the first time, completely melted off and re waxed the second time, and the bees STILL insisted THIS was their drone foundation.
After the third attempt to get them to draw worker foundation I left them alone, and they got along splendidly. They were perfectly content with what they had built. It in NO WAY matched the cell pattern under it, but apparently they did not care. No matter the foundation you choose, you still need to be prepared to fix the issues as they come up.
Fixing problems that happen with foundation is not as easy as fixing problems with foundation-less frames. With plastic, a corner blow out like this requires cutting the wax back, and scraping the bottom of the frame to clear the wax where the plastic fits into the bottom groove. It IS doable, but it takes more time. With foundation-less, my pocket knife, a dab of glue, a couple nails and the frame is back in the hive. Neither situation is an end all for this frame, I just feel its easier to deal with if the plastic is not there.
If your thinking that making your own frames is too time consuming then you will probably not relish the thought of installing wired wax foundation. I know the bees like it, and draw it with no arguments, but the time it takes to install seems wasteful after using foundation-less a while, as well as expensive!
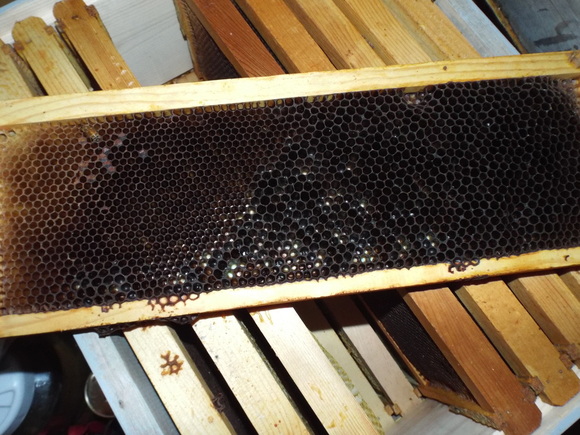
Mess up a frame of Duragilt and the bees won't fix it, they will work around it, and it will mess up every other frame. This one was pulled out of the groove at the bottom causing it to warp. The box got dropped or the frame got bumped etc and it was not caught in time. There is no fixing this. they stripped the wax off the bulged side and filled the groove in with Propolis. By the time you had this piece back in, 3/4 of the comb would need rebuilt, it would be quicker to pull it out, clean the frame and put a new piece of wax in, or let them make their own foundation.
Trick;
If you need frames drawn or repaired, and want WORKER comb, use a small hive or nuc to draw or repair those frames. 99.7% of the time they will draw perfect worker comb.
As seen above I have to scrape plastic JUST as often as I have to fix messed up foundation-less comb. The difference is, when the bees mess up foundation-less comb, I just cut it out and give them the frame back.. If I want to get fancy, I rubber band the cut out piece of crooked comb back into the frame correctly and let them fix it. No different than if you were doing a cut out from a house or other structure. To me, its easier than dealing with wires or a piece of plastic. Scraping the plastic generally tends to fill in the little comb impressions and the bees draw what they want over the top, usually Drone Comb.
Natural comb doesn't bring any contaminants into your hive from where ever the wax they are made from, or coated with was purchased. A VERY large percentage of beekeepers, especially commercial beekeepers use chemicals to treat their hives for Varoa, and Tracheal mites, as well as Nosema, foul brood etc, etc.. These things accumulate in the wax, and that does not take into account the fungicides and insecticides (Neonics etc.) that the bees bring in on their own. ALL of these things are present in the wax. There is NO SOURCE of commercial wax that is not contaminated to one extent or another. Worse, is the wax brought in from places that have less, if ANY control over those pesticides and other chemicals..
So think about that before you condemn foundation-less.
I do not condemn foundation in any way, I only dislike paying for something I do not need.
Installing foundation-less frames in your hive.
If you are using foundation to start, let the bees draw it out, then rotate in foundation-less frames between well drawn foundation frames.
With a drawn comb to either side of it, the bees are nearly guaranteed to draw a perfect comb.
I have ripped out a piece of wax that was warped and dropped the frame in with no additional guide between two drawn combs and they made beautiful comb.
When installing multiple foundation-less frames side by side you will need to keep an eye on them. They will start the frames I make perfectly aligned, but may deviate as they draw it down, creating a wave or bulge. In this situation I run my comb knife across it to flatten it and drop it back in. If I can put it back in with the modified section beside smooth flat comb I do so, and they will repair it to perfection.
Rotation;
I use all medium boxes. I have spoken of the reasons before, but will stick with only one of those reasons here.
My bees winter in three medium boxes. By early spring, the bees are near, or at the top of the hive. Three medium boxes, allows me to pull the bottom box out. Cut the wax out of the frames, and place that box on TOP.
I have just rotated out three year old comb. Next spring I will do it again. This insures that my wax is no more than three years old. Good clean comb to avoid problems with superseding queens and sterile drones, plus, My wife gets extra wax for her candles.
Less problems for the bees to deal with is the goal. Leaving a 1/2 inch of wax around the edges insures they will start and run it straight.
Natural cell size helps with Varoa Mites!!!
I have yet to see proof of this. I see many claims, both for and against any effectiveness of small or natural cell. The claims I have seen, range from natural or small cell helping the bees natural defense kick in, so they begin uncapping cells and removing larvae infected with the mites, to a shorter emergence time of up to a day, that messes up the Varoa breeding cycle... I am not on that bandwagon yet. What I do know, is that it doesn't HURT the situation.
Up until around 1893 all beekeepers used either 4.9mm or natural cell, which ranges in size from 4.6 to 5.1mm. This measurement is taken across ten cells, from outside wall to outside wall.
After that time the cell sizes were enlarged to 5.4mm, with the thinking that a larger bee meant more honey. This cell size has been the standard for more than 90 years.
Some people think this artificial cell size may be part of the problem that bees face today. They believe that natural or small cell aid in both tracheal and varroa mite resistance. As I said, I am not on that bandwagon yet. What I do know, is that standard or small cell allows for over 20% more cells per frame. Natural cell allows the bees to build the drones THEY decide they want in the hive. It is my belief that a balanced hive is healthier, and happier. A balanced hive will have all the right Pheromones. Queen, brood, worker, and drone.
There are a LOT of beekeepers still using the old industry standard and doing very well. This is one of those areas YOU have to decide what will work best for you.
Price!
To some people, this is not a factor. If they have three or four hives, then they are very correct. If you only ever intend to have a few hives, then I recommend, by all means to buy the absolute best you can find. Get garden covers and cypress, Cedar or custom walnut and urethane the hive so it looks gorgeous!!
The problem comes in when you decide to grow, and suddenly need to buy 20 hives.
20 hives, with 4 boxes each translates to 800 frames. If I bought frames, and foundation, it would cost me in the neighborhood of $1600.00.
Making my own frames with no foundation costs me about 240 dollars. If your rich, or only need a few hives, then you don't care how much it costs. Ease is better than cheap in that case.
TIME!
There is a bit of compromise with time. If you are retired, then the time it takes to make all those frames isn't as big a deal. If you work full time and don't want to spend the time it takes, you can still save money by using wedge top frames and nailing the wedge in sideways to create a starter strip. You still pay the 800 dollars for the frames, but you save the 800 dollars on the foundation.
Waxing the frames.
I rub wax on my new frames as already stated... usually. I haven't had any more issues on the frames I didn't rub wax on, than the ones I did. I am thinking it may not be necessary at all. I will find out more this year.
Opening my box of frames and realizing these hadn't been rubbed yet caused me to install them fresh from the wood shop to avoid a trip back to get a different box.. those lovely ladies never complained, and drew out the frames without hesitation.
Extracting!
I don't want to have to deal with all the blow outs when extracting!
If you use a little common sense, you wont have many blowouts, if any at all.
FRESH new frames are more likely to blow out. Once the wax begins to set up a bit, and is connected to at least three sides of the frame, it won't blow out unless you turn the extractor up to wow, or start spinning too fast too soon. If your still nervous put support pins in the sides of your frames and let the bees build around them for a little extra support. Rotate fresh new comb down into the hive, leaving those frames for the bees to winter on, pull the frames of honey from the hive to extract.
And so you know, if you have a piece of well drawn PLASTIC honey comb, and toss it in the extractor, you can sling the wax right off of the plastic. So a little common sense helps no matter what type of foundation you use.
Natural comb also lends itself well to cutting out queen cells, or doing cell punch to raise a few new queens. No plastic, or wire to worry about getting in your way. No struggle to get the queen cells off the comb. Carefully cut them out and use them as you see fit.
Punch out one day old larvae, fit the wax into a cell cup, and hang them in a queen-less hive so they can make a few nice queens to re queen your hives from stock YOU like.
NOTCH a frame with eggs, and do the same thing. Let the bees turn those notched cells into queen cells. When they are capped, they can be EASILY cut out and put into the hive or nuc you need a new queen in.
I get a lot of resistance when saying I wish I had started with foundation-less. Most saying that it will ruin a beginning beekeeper..
I suppose there is some merit to that. It does take a little different management and care. The FIRST partially drawn foundation-less frame I EVER pulled out of a hive fell off the frame and landed on my boot. The bees were NOT impressed! Handling them requires a different mindset and technique. Once they are well attached and have started to harden, they are no more difficult to deal with than wax foundation. I DO wish I had started out using them, but I am a determined individual that is hard to discourage when doing something I enjoy. I know I would not have given up because of a couple of messed up combs, but will agree that it may not be for everyone, especially starting out from scratch.
Beekeeping can very quickly start to feel overwhelming. You can avoid a little worry and fuss by starting with wired wax or plastic foundation. Once they have drawn the comb out on that foundation, slowly rotate in foundation-less between those drawn combs, and you will find that 99.5% of the time they will draw a PERFECT frame.
What about that other .5%?? No different than how often you will have to scrape plastic or put in a new piece of wired wax.
I am in no way degrading those who USE foundation of any type. We each have to find what works best for us. What works best for the money we have to spend, and the time we have available. The fact that there are so many methods that WORK is the beauty of beekeeping.